Bathroom Bullnose Tile Trim
Bathroom Bullnose Tile Trim
If you'd like to find out all about tile edge trim, you've come to the right place!
This is Steve with SKG Renovations. In this post I will be providing you with an assortment of tile edging options and some helpful installation strategies.
And it gets better!
I will also go through a real life installation example to show you how it's done by a professional.
And if you'd rather get some super valuable tile installation tips, check out my Shower Tile Installation post.
Ok, let's get into it!
Summary of Topics:
Please use the links below to skip to any section that interests you.
Alternative to Bullnose Tile
Ceramic Tile Edge Trim Profiles
Metal & Plastic Trim Profiles
Tile Edge Trim Finishes
Trim Depth
Outside Tile Corner Trim
Square or Mitre Joint on Tile Corner Trims
An Easier Alternative to Shower Niche Trim?
Inside Tile Corner Trim
Inside Corner Dilemma
Product Types
There are four main types of tile edge trim that can be used to finish the perimeter of your tiling installations.
These include stone trims, porcelain or ceramic trim tiles, as well as plastic and metal trims.
These come in various configurations depending on the product and their use, but the metal tile trims (metal tile edging) and stone trims are the most popular.
Alternative to Bullnose Tile
If you are not excited about using a standard tile edge trim profile, you can use real or engineered stone instead. This is one of the fastest growing tile edge trim ideas, quickly displacing the standard tile edging options.
Capping a shower pony wall or framing the inside of a shower niche with polished stone creates a beautiful high end finish, and also provides a great alternative to bullnose tile.
The stone material is quite thick (a choice of either 2cm or 3cm thickness) so it offers the opportunity to create a finished trim by polishing the outside facing edge.
This strategy is becoming more popular because it creates a very compelling seamless look and is easier to install than other trims. It can also produce a beautiful modern or classic finish depending on your choice of stone.
The downside is that it can be significantly more expensive than a standard tile edge trim installation due to the high cost of the material and fabrication.
You should also keep in mind that these types of stone installations require very accurate measurements and a skilled stone fabricator to cut and polish the stone pieces.
Ceramic Tile Edge Trim Profiles
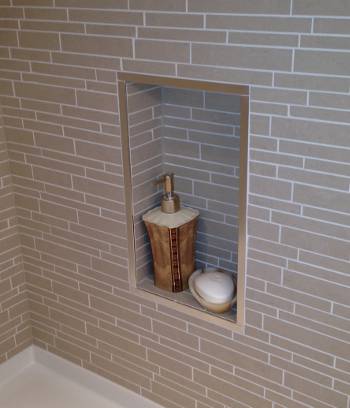
Ceramic tile edge trim profiles can have a finished square edge, or more commonly a larger radius bullnose edge.
These types of tile edging were common in modern designs during the 1980's and early 90's but are no longer popular in todays modern bathroom designs.
There are some unique modern trim tiles available today, but they are usually special order items and generally quite expensive.
In contrast, it is quite common to see these tiles in more traditional design schemes these days.
The attached image shows a ceramic trim tile being used very nicely around a tiled shower niche in a traditional bathroom design.
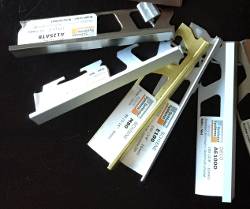
Metal and Plastic Tile Edge Trims
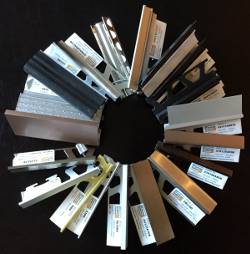
Metal tile trims and plastic tile edge trims come in several profile shapes and colors, but plastic is the least popular of this group because they do not stand up well to abrasion.
The metal tile edging is by-far the most common trims used in most mid-cost and higher end renovations (image of sample trim wheel).
They are ideal for high abrasion areas such as floors, but have also become a standard in most shower wall tiling installations.
They are available in the widest range of finishes and profile styles, but the profile with the very narrow top edge is the most popular (for example, Schluter Jolly).
There are a large selection of Shluter profiles available. You can see them all on the Schluter Systems website.
Most home stores carry Schluter profiles but you can usually only get the Jolly profile without special ordering them. There are a few more Schluter profile options readily available online.
Tile Edge Trim Finishes
If you've decided to install a metal tile edge trim, and you've picked the type and style you want, then it's time to choose the finish.
You should be prepared to select your trim finish well in advance of your tiling project because some finishes are special order items.
You should also be prepared for a wide variation in price. Some of the less popular finishes can easily be twice (or more) the cost of a more common finish.
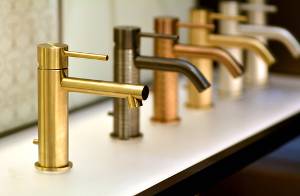
The general rule when picking a tile edge trim finish is to try your best to match the trim with your bathroom fixture finishes, although there are some exceptions.
Generally when choosing your finish, you should keep in mind that tile edge trim should be an attractive compliment to your bathroom design, but not a stand-out feature.
Trim Depth
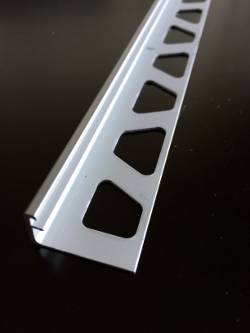
It is not always obvious what depth you should select for your metal tile trim, even when you have your tile and trim in hand at the home improvement store.
It is a good strategy to err on the plus side for your trim depth to avoid the terror when you see the tile edge protruding above the trim during installation.
To choose a trim depth that is 1/16" to 1/8″ deeper than your tile is standard in the industry. A DIY'er should stick with a the 1/8″ deeper trim option to give themselves a bit more of a safety margin.
Because the bonding portion of the trim sits beneath the tile (the cross hatched flange seen in the image), it is important to allow enough mortar beneath the tile to allow it to bond to the trim, and the trim to bond to the tile backer board.
Squeezing all the mortar out between your tile and trim mounting flange reduces bond strength significantly so DON'T DO IT!
Another thing to be aware of if you are installing only ceramic tile, is that many people have the tendency to choose their tile edge trim depth based on the thinner outside edge of the ceramic tiles they are using.
This will get you into trouble when you have to match the thicker cut edge against the trim in a staggered tile layout.
If you are installing a waterproofing membrane after you secure your tile edge trim in place, you must also remember to accommodate the membrane thickness in your choice of trim depth.
Remember that you can always add a little extra mortar to raise the tile to meet the trim depth, but you are totally stuffed if you choose a trim depth that is too shallow.
Trim Depth Example

The example image shows two different tiles installed with a 1/2″ trim.
The darker tile is porcelain with a thickness of almost 3/8″ and the surrounding tile is ceramic with a 1/4″ thickness.
The ceramic tile has lots of room beneath, requiring 1/8″ thick layer of buildup material beneath to allow it to match the porcelain tile and trim.
However, the trim is a perfect depth for the porcelain tile. This 3/8″ tile requires an extra 1/8″ of depth for trim & tile to match evenly, due to the extra thickness added by the waterproofing membrane, and an allowance for some mortar beneath.
Outside Tile Corner Trim
When it comes to shower tiling, you may never need to worry about outside tile corner trims for your tile work unless you are installing a tiled shower niche or tiling a pony wall or shower bench.
To clarify, outside tile corner trims used exclusively for the corner where two of your tiled surfaces meet at 90 degrees.
These days it is most common to use a metal tile edge trim for these corners but as I mentioned previously, another great alternative tile edging option is natural or engineered stone.
With stone you can relieve yourself of the burden. Leave the cutting, edge finishing and installing to your stone fabricator instead.
Just keep in mind that stone is expensive and requires a skilled stone fabricator to cut & polish them.
Square or Mitre Joint on Tile Corner Trims?
If you choose a metal tile edge trim, it must be installed with skill and precision.
This trim piece is usually quite visible and you don't want someone's shoddy work to be on display in your new shower remodel.
Firstly, if you want this installation to go smoothly, you should follow the strategies I have covered in the sections above.
The challenging part will be matching the four corners evenly, with no gaps.
You have two choices: Meet the two pieces of trim in the four corners with a square joint, or use a miter joint (45 degree joint).
The first option is clearly the easiest and offers the highest chance of success (see image), but it does not look as professional as a perfect miter joint.
Another important condition is that you can only achieve a decent square joint when the top of the trim is flat. This can be achieved quite satisfactorily with Schluter Shiene or Jolly.
With other more complex profiles, a miter joint will be required.
If you decide on miter joints for your shower niche outside trim, it's always safest to get a skilled and experienced tiling professional to do this work.
An Easy Alternative to Shower Niche Trim?
If you want another alternative to installing a shower niche trim and avoid the outside corner installation problem altogether, you can always install a finished shower niche with a built in tile edge trim.
This look isn't for everyone but if you like the metallic look of a finished shower niche, it can sure save you a lot of work and also eliminate the risk of leaks.
Inside Tile Corner Trim
Finishing inside corners is an important part of every shower tiling project, but it is also the most ignored when it comes to tile edging.
There are some challenges to these inside corners and some elegant products and strategies available to meet these challenges.
There are also some very useful and interesting tile edge trims that are not routinely used in modern bathrooms and showers but are also worth considering.
Inside Corner Dilemma
If you are like most tiling contractors, you will have some issues with finishing inside corners on wall tile installations.
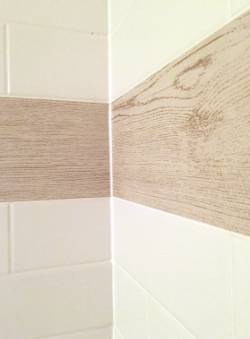
When wall tiles meet at a corner, you have a choice of tiling right up against the adjacent tile and rely on a white silicon bead to seal the corner (see image). Or you can cut the tile to create a grout line on one of the two walls.
The former strategy is the most common mostly because it is simply the easiest of the two.
A grout line in the corner tends to interrupt the visual flow of tile from one wall to the other, and is not generally considered to be a good look.
Although these are the most common strategies, there are also some interesting and professional looking alternative tile edging options available.
Other Interesting Trims
The inside corner tile edge trim (also called a cove trim) provides a professional finished look and is one of the most under appreciated tile edge trim ideas, in my opinion.
The benefits of this trim are an attractive metallic finish compared with the standard grout or silicon corner.
It also has a smooth radius making it easier to clean and provides two grout lines, allowing the corner to be completely sealed.
A baseboard trim is also available for installation outside of the shower if your floor & wall tile meet. It has a very thin top profile and various bold metallic finishes, great for minimalist designs.
There are also some very nice tile edge border profile trims designed to be mounted within a section of wall tile to create a separation between two different tiles, or simply as a bold interruption in the your wall tile design.
There is even a wall profile trim with a shallow track down the middle for mounting a strip of 1″x1″ mosaic tiles. A very classy look.
Wrap Up
I hope that this article has provided you with some confidence (even mastery) in the area of tile edge trim. I have attempted to shown you a range of the most popular and interesting tile edge trims, along with a few useful hints to help you with installation.
If you have any thoughts you would like to share or any questions about this post, or the topic of tile edge trim in general, please leave a comment below.
This post is for information purposes only and should NOT be interpreted as professional advice. You should always consult a licensed local contractor before undertaking any remodelling work in your home. Click here for my full Personal / Professional Disclosure.
Source: https://redblockindustries.com/blog/shower-remodel/tile-edge-trim/


Tidak ada komentar:
Tulis komentar